
So you want to install XAMPP on Mac and stop paying for hosting just to test a PHP script? Good call. XAMPP is still, in 2026, the fastest way to spin up a local server with Apache, MySQL, PHP and Perl on macOS without touching a single config file by hand. I’ve done it dozens of times on Intel and Apple Silicon Macs, and the process is ridiculously simple — but there are a few gotchas nobody tells you about.
Let me be blunt: most guides out there just repeat the four official steps and call it a day. That’s lazy. If you’re on an M1, M2 or M3 Mac, or if you’re on macOS Sequoia or later, you’ll hit small permission issues that will make you think XAMPP is broken. It isn’t. You just need to know where the traps are.
What XAMPP Actually Does on macOS
XAMPP is a free, open-source stack that bundles Apache (web server), MariaDB (the MySQL drop-in replacement), PHP and Perl into one installer. In plain terms: it turns your Mac into a local server so you can run WordPress, Laravel, plain PHP scripts or any MySQL database without uploading anything anywhere.
The big win of using XAMPP as a local server on Mac is isolation. You break things, you delete the htdocs folder, you reinstall — and your real projects never notice. It’s a sandbox for developers who don’t want to mess with Homebrew, Docker or manual Apache compilation.
How to Install XAMPP on Mac: The Real Step-by-Step
1. Download the correct build for your Mac
Go to the official Apache Friends site (apachefriends.org) and grab the latest XAMPP for macOS. Two things matter here: pick the version that matches your CPU, and never download it from random mirror sites. Fake installers are a real thing.
On Apple Silicon Macs, XAMPP runs through Rosetta 2 by default. It works fine — I’ve run it for years — but the first launch will ask you to install Rosetta if you haven’t already. Say yes. There’s no native ARM build that’s officially maintained, so don’t waste time hunting for one.
2. Install the .dmg like any Mac app
Open the .dmg file and double-click the installer. It will ask for your admin password because it needs to write to /Applications/XAMPP and set permissions. Accept the defaults, keep Apache, MySQL, PHP and phpMyAdmin checked, and let it finish.
Here’s the gotcha: macOS Gatekeeper might block the installer with a message like “cannot be opened because the developer cannot be verified.” Fix it by right-clicking the .dmg and choosing Open, or by going to System Settings → Privacy & Security and clicking “Open Anyway.” Do not disable Gatekeeper globally. That’s amateur hour.
3. Launch XAMPP and start the services
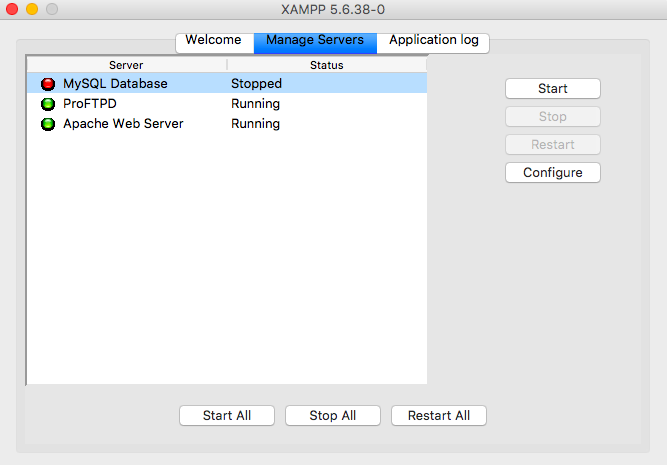
Open XAMPP from your Applications folder. You’ll see the Manager OS X window with tabs for Apache, MySQL, ProFTPD and Tomcat. Click Start next to Apache, then Start next to MySQL. Both should turn green.
If Apache refuses to start, 9 times out of 10 it’s because macOS’s built-in web server is already using port 80. On modern macOS this is rare, but it happens if you’ve installed something like MAMP or a Homebrew Apache. Change XAMPP’s port in httpd.conf to 8080 and you’re back in business. Don’t reinstall the whole thing — that’s a rookie move.
4. Test your local server
Open Safari, Chrome or whatever you use and type localhost in the address bar. You should see the XAMPP welcome dashboard. That page alone confirms Apache and PHP are alive and talking to each other. If nothing loads, check the XAMPP control panel again — one of the services is probably dead.
5. Drop your project into htdocs
Your web root lives at /Applications/XAMPP/htdocs. Every folder you create there becomes a subfolder of localhost. So if you make a folder called myproject, you access it via localhost/myproject. That’s it. That’s the whole trick.
One thing people screw up: file permissions. If PHP can’t write to a folder, your WordPress install will fail. Run chmod -R 755 on your project folder if things act weird. Not elegant, but it works.
Managing Databases with phpMyAdmin on Mac
phpMyAdmin comes bundled and is accessible at localhost/phpmyadmin once MySQL is running. Default username is root and the password is empty — yes, empty. It’s a local environment, so that’s fine, but never copy that setup to a production server. Ever.
From phpMyAdmin you can create databases, import .sql dumps, run queries and export backups. If you’re learning MySQL, this is where you’ll spend half your time. Bookmark it.
Common Problems and How I Fix Them
- Apache won’t start: port 80 conflict or a leftover process. Check with sudo lsof -i :80 and kill whatever is squatting there.
- MySQL crashes on launch: usually a corrupted ibdata file after a hard shutdown. Delete /Applications/XAMPP/xamppfiles/var/mysql/ibdata1 only if you have no databases you care about — otherwise, back up first.
- Rosetta prompt loop: reinstall Rosetta with softwareupdate –install-rosetta from Terminal.
- localhost shows a blank page: a PHP error is being suppressed. Turn on error reporting in php.ini.
XAMPP vs Alternatives in 2026
Look, XAMPP isn’t the only game in town. Laravel Herd, MAMP and Docker-based setups like DDEV exist, and for some workflows they’re better. Herd is native ARM and faster on Apple Silicon. Docker gives you reproducible environments that match production.
But if you just need a local Apache server on Mac to test a PHP site today, without reading documentation for two hours, XAMPP still wins. It’s boring, it’s old, and it works. That’s worth more than elegance.
Where XAMPP Files Live on macOS
Knowing these paths saves you hours: web root is /Applications/XAMPP/htdocs, Apache config is /Applications/XAMPP/xamppfiles/etc/httpd.conf, PHP config is php.ini in the same etc folder, and MySQL data is under xamppfiles/var/mysql. Learn them once and you’ll never Google “where is htdocs on Mac” again.
Bottom line: installing XAMPP on Mac takes ten minutes if you know the traps. Download the official build, watch out for Gatekeeper, start Apache and MySQL, drop your code into htdocs, and you’re running a full local server on your Mac. No hosting bills, no uploads, no waiting.